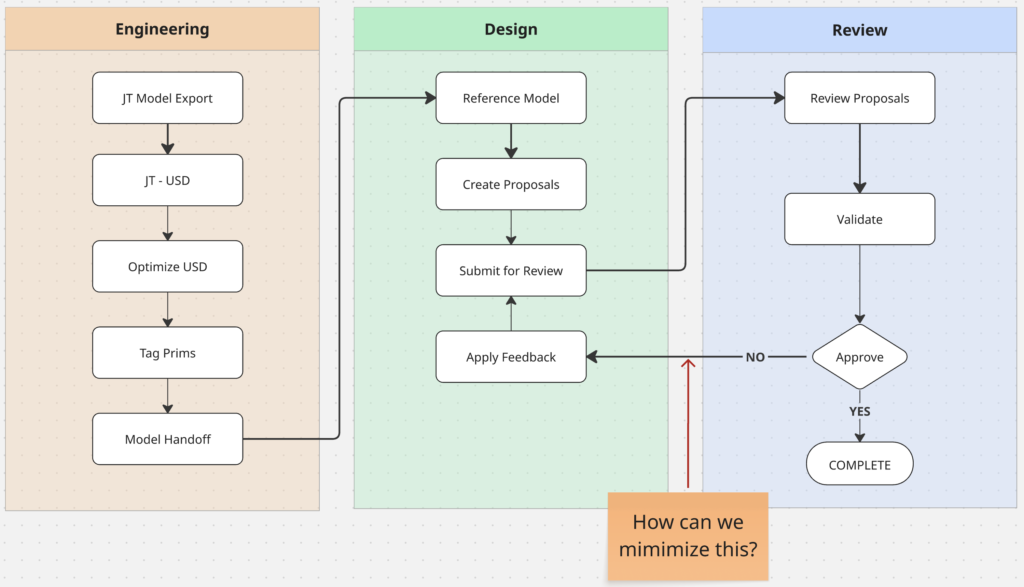
In this article, we’re going to architect an NVIDIA Omniverse CAD-to-USD pipeline that preserves structural intent by giving downstream design teams real-time feedback when they make invalid changes.
OpenUSD has built-in constraints called LIVERPS (liver peas) to enforce outcomes through layer strength ordering.
- Local
- Inherits
- Variants
- rElocates
- References
- Payloads
- Specializes
While LIVERPS maintains structural integrity in the end, that’s not always helpful for user awareness. If a designer gets ambitious and tries to move a load-bearing column to improve a scenic view, their changes would either be ignored or rejected.
Rejections are something we should aim to reduce in production workflows since they can be costly. We’ll help do that with a simple Omniverse Kit extension that informs the user when they’re making an unauthorized change.
Creating Our Pipeline
Let’s create our CAD-to-USD pipeline using an example lobby structure to help us mimic how this would work in production scenarios.
Prep Your CAD Model
I’ve prepared this CAD model from OnShape, which we’ll treat as our Lobby floor plan. You will need to create a free account to access it.
Select everything visible in the OnShape UI, right-click and export as a JT file.

NVIDIA Omniverse
Once we have the model’s JT file saved locally, we need to spin up Omniverse USD Composer with the omni.services.convert.cad extension enabled. This extension will already be enabled in the template USD Composer application.
You can use the Introduction to Developing With NVIDIA Omniverse learning path to help you get USD Composer built and launched.
Convert JT to USD
Once you have USD Composer running, use the Content Browser tab to navigate to your Lobby.jt file, right-click it and select “Convert to USD” to open up the Convert Options window.
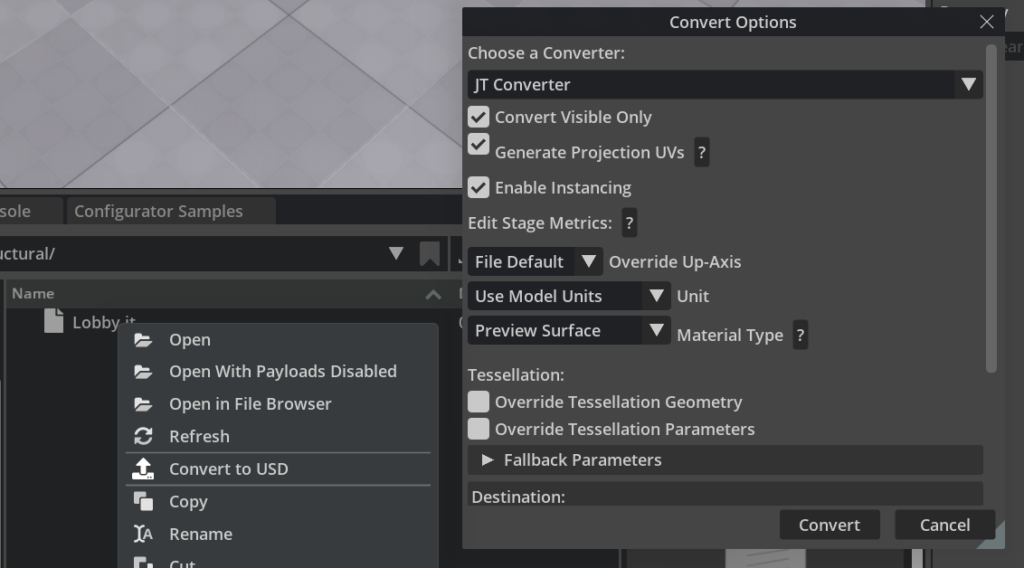
We’ll use the default settings for this project. Hit “Convert” and within a few seconds you’ll see a new Lobby.usd file in our content browser tab with our Lobby Xform in our Stage along with a new layer:
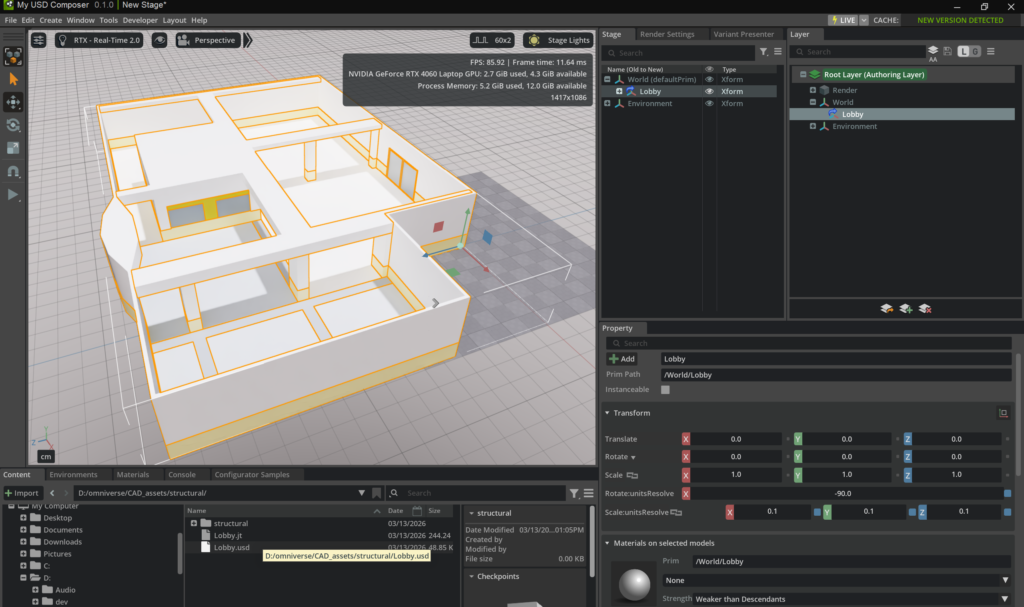
While this seems nice, we need to make a key adjustment. We don’t want our new USD file loaded directly as an Xform in our stage like it is now.
We need to create a proper reference to our Lobby.usd file in a new stage. Before we do that, we need to spend a few minutes ensuring our model is optimized and ready to be used down stream.
Close the current file without saving and open the Lobby.usd file.
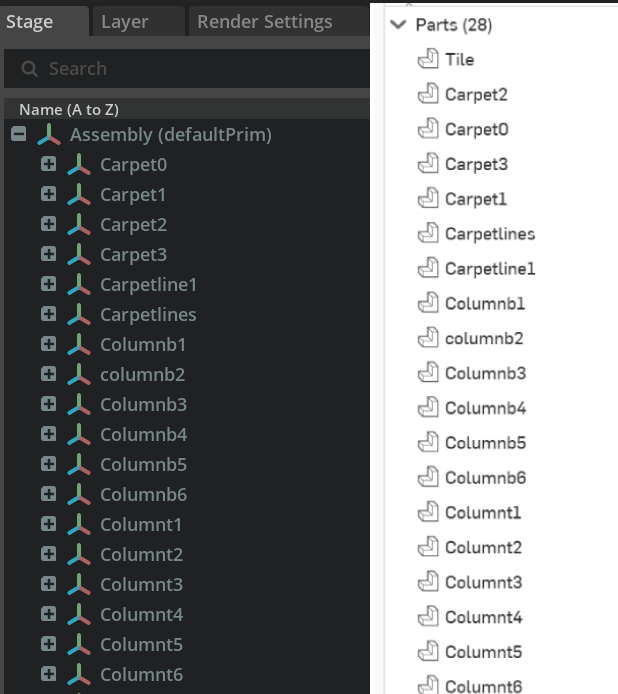
Validate the Model Structure
This is a great time to compare our Lobby.usd and the original CAD file structure to ensure everything came through correctly.
Optimize the Model
Next, we’ll open the Scene Optimizer under the Windows > Utilities menu.
We’ll use the preset Merge Meshes as an easy way to demonstrate this process, but details of this step will depend on your specific project.
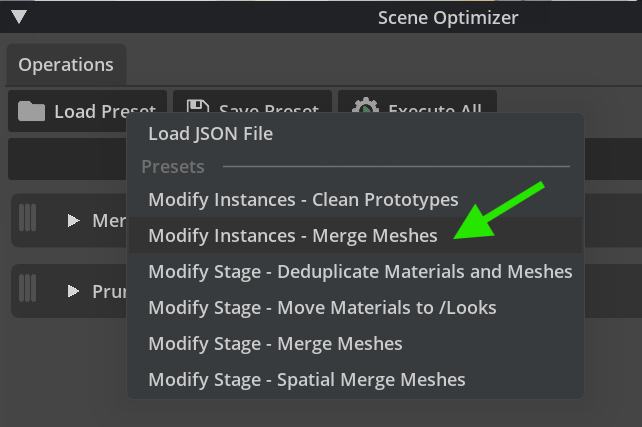
Click the Execute All button to run the optimization.
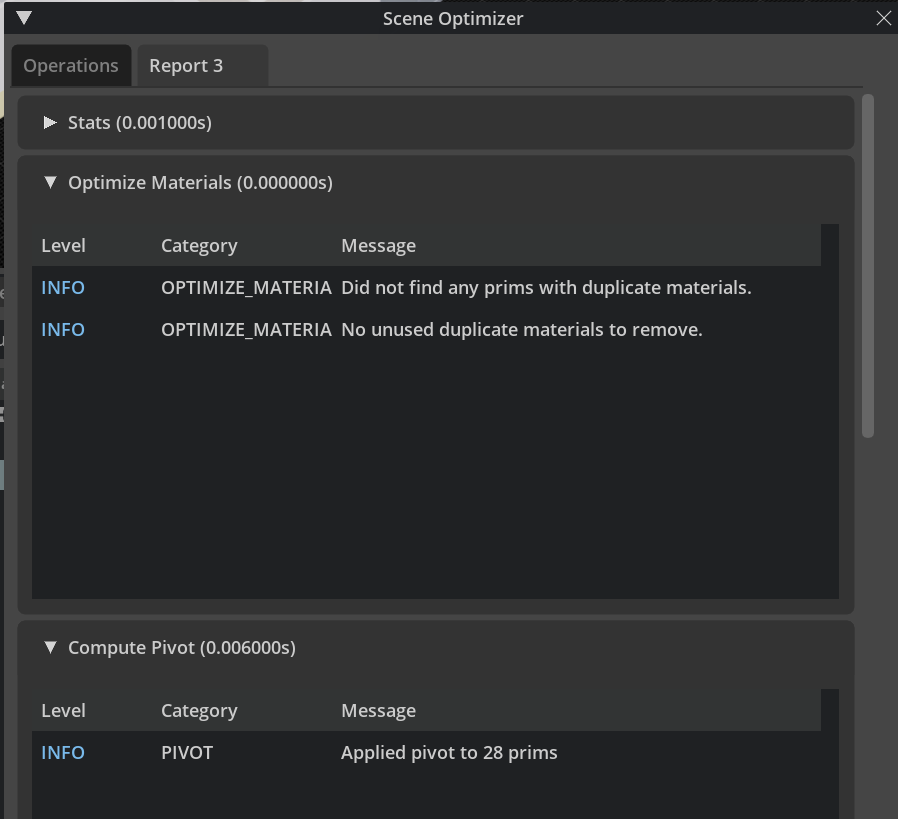
You can open the Report to view information about the processes we just ran.
Don’t forget to save your work!
Tagging Structural Prims
With our Lobby.usd file still open, we’re ready to “tag” our structural prims so we can access them with code. This will set the foundation for our extension that we’ll be creating later.
We’ll do this by using a custom USD attribute.
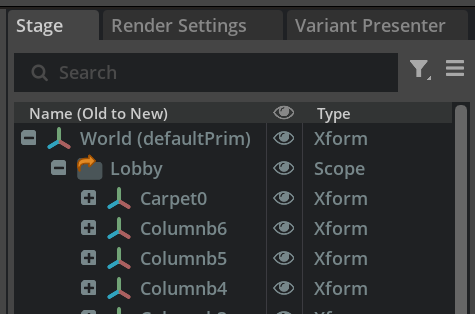
In the Stage, you can search for prims with “column” in their name to view the full list of column structures. We’ll only focus on tagging these for purpose of this example project.
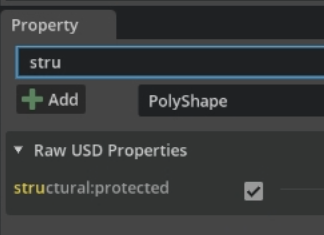
Select the first column prim in the list and click the “Add” button in the Property tab. Choose “Attribute” to see the dialogue window pop up.
Set the label to structural:protected with a data type of Bool and click Add.

Now, you can search the properties to find the new attribute we created. Once you find it, check the box to set it’s value to “True”.
With that set, you simply repeat this process for each of our column prims (both tops and bottoms). USD Composer helps to streamline this by using your previously entered values, which is nice. You can also create a script to do this if your working on a larger project.
This process applies to a variety of use cases where accessing prims with code adds value to your workflow.
Design Layer Setup
Now that we’ve completed our engineering steps to ensure our Lobby.usd is ready to be used in our pipeline, we can start prepping our design workflow.
Create a Proper USD Reference
In USD Composer, go up to the “File” menu and select New From Stage Template > Empty. Be sure to save the Lobby.usd changes if you haven’t already.
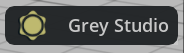
Now, you’ll see a empty stage without any lighting. You can select the “Grey Studio” option in the upper right hand corner of the preview window, which will allow us to see our model even though our scene doesn’t include any lights.
In the Layer tab, right-click the Root Layer and select Create Sublayer. Let’s save that as Floor_Plan.usda then right-click that layer and select Set as Authoring Layer, so any changes we make will apply to this layer.
Now we can right-click on the “World” Xform in the Stage and create a new “Scope” to act as a folder to hold our Lobby.usd asset. In fact, right-click our Scope folder and rename it to “Lobby” to keep things organized.
Then, we right-click our lobby scope to add a new “Reference” as shown here:
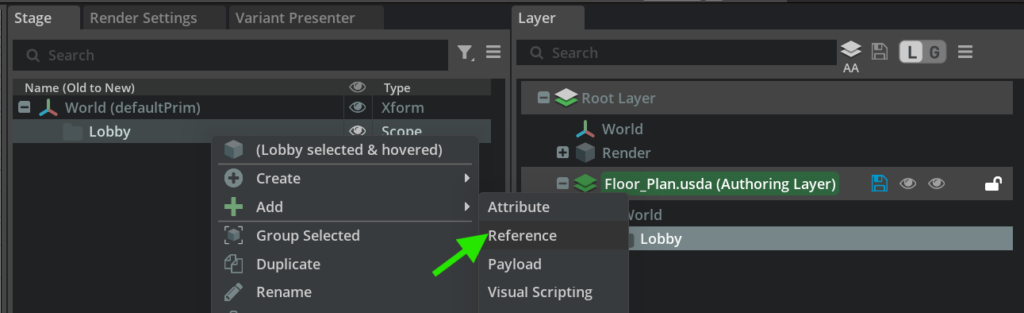
Navigate to our Lobby.usd file and select it.
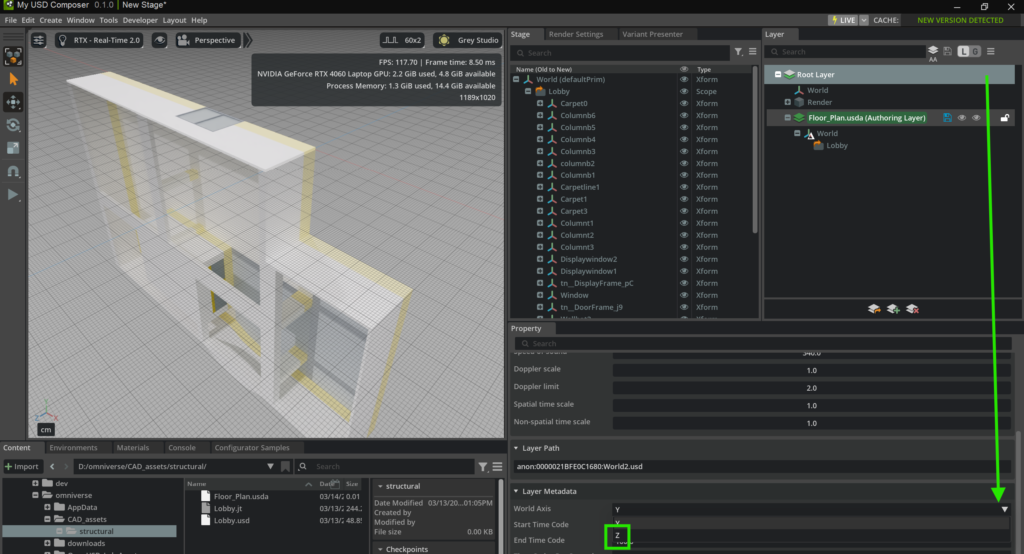
You’ll notice that our floor plan is standing on end. To fix this we need to click the Root Layer and change the layer’s World Axis metadata from “Y” to “Z” to get our lobby back on the ground.
Let’s save this as “Structural_Demo.usda”. Now we’re set up with a place to work on our design proposals without altering the original floor plan model in any way. We would have to open the original Lobby.usd file directly to alter it now, but we don’t want that.
We want to layer our changes as an “opinion” on top of the original model and this setup allows us to do just that.
Notice the orange arrow on our Lobby Scope folder icon. That indicates that this is a reference proving it can be safely altered without destroying the original file.
Creating Variants
At this stage of our project we’re going to put on our designer hat and imagine what proposing alternative finishes for the columns might be like in our workflow.
We’ll do this by setting up variants that will allow reviewers to view the different appearances of the columns with minimal effort. This does require us to set some things up.
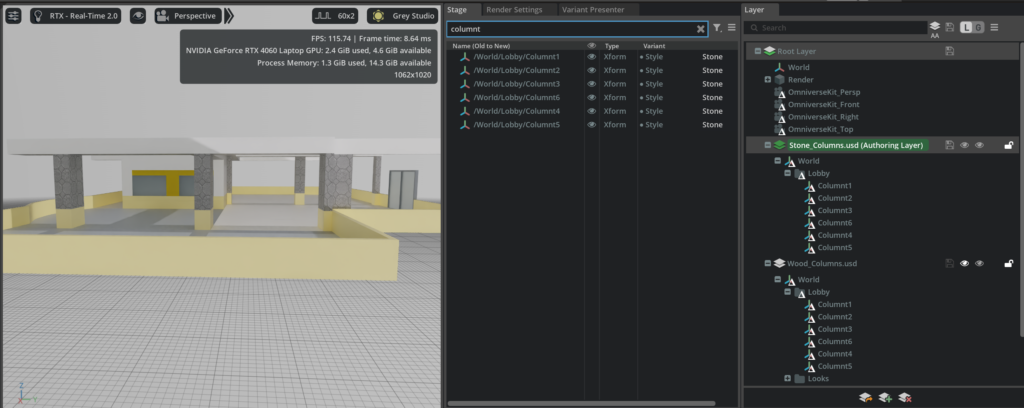
First, let’s add the Variant column to our Stage details by clicking the hamburger menu > Columns > Variant as shown below.
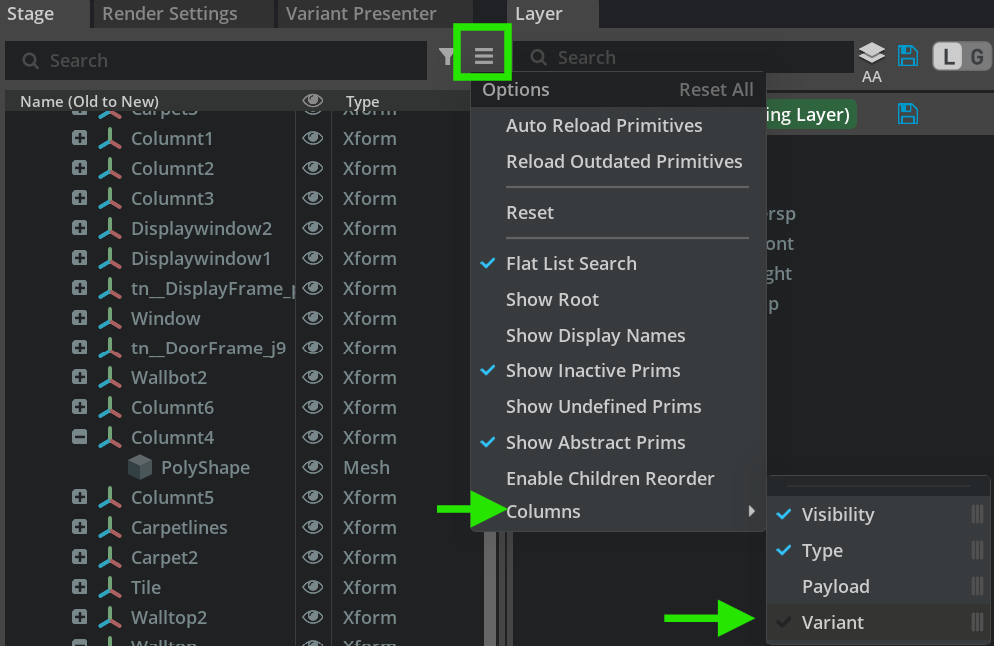
This will allow us to add a menu of options that others can use to review the ideas we’re proposing.
A Critical Step!
This is where I have to pause to explain something critical to streamline our workflow.
Our columns in this file aren’t setup as instances to allow applying a finish variant to one and have it appear on all columns. The current setup requires each of the 6 columns to have a separate variant option manually applied, which is not an efficient user experience for our reviewers.
If we spend a few minutes to make some adjustments, we can streamline this so reviewers can alter the appearance of all the columns within a click or two, at most. In production workflows, less clicks matter!
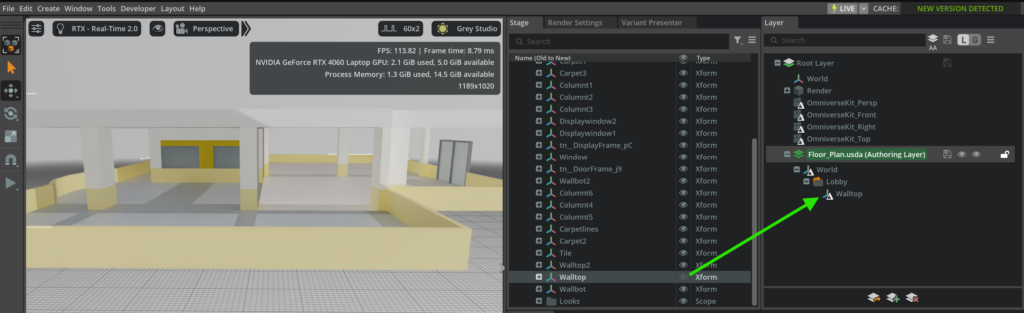
Let’s start by hiding the outer walls (Walltop) so we can line up a view to see all of our columns at once. You’ll see doing this creates a new sublayer under our Floor_Plan layer to capture the change we’ve made to the scene.
Next, let’s focus on each of the 6 columns from the stage. We can search for “Columnt” in the Stage tab to make them easier to access. Columnt represents Column Top. We’re not going to worry about the bottoms in this portion of this exercise.
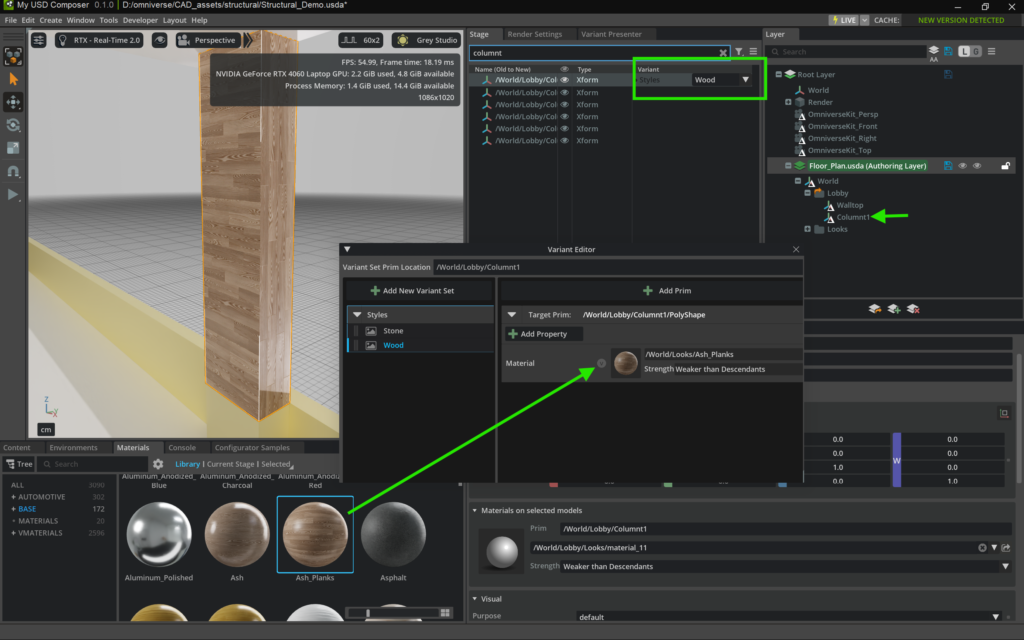
Right-click on the Columnt1 Xform and select Add > Variant Set.
This will open up a window where you can right-click and rename the Variant Set to “Styles”.
Click the plus button to add a new variant. Right-click that to rename it as “Stone”.
While on this stone variant, click the Add Prim plus button and select PolyShape.
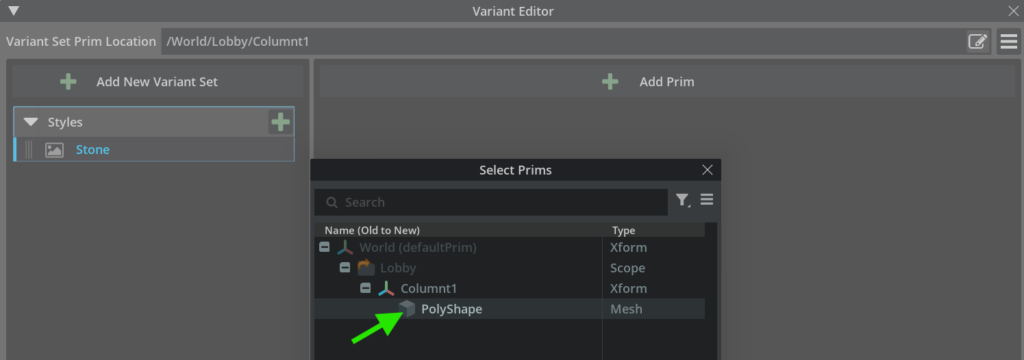
Click the Add Property button to see a list of available properties we can use. We’ll add material:binding so we can adjust the style of our columns with the materials available in Omniverse.
In fact, lets open the Materials tab and select BASE to apply one of these materials. I’ve chosen Adobe_Octagon_Dots, since it’s a cool stone looking tile.
Drag that onto our material property for the Stone style variant.
Next, let’s duplicate Stone and rename it “Wood”. Find a wood material, like Ash_Planks, and drag it into our material property for our wood style variant.
At this point, you can hit the “F” key in the preview window to see our column as the Wood style applied. You’ll also notice that Columnt1 has been added to our layers to capture this change, plus there’s a dropdown in the Stage Variant column where you can toggle our style.
A slightly annoying part for us is that we’ll need to go through this process for each of the columns to get them setup with our variants, but it will be worth the extra work to help our reviewers save time downstream in this workflow.
Before we do that, I noticed I’ve built a mistake into this tutorial! That’s okay though, as this is the perfect time to fix it and will make this a great learning opportunity while also building in some muscle memory.
Fixing The Mistake
One key takeaway when working with USD is that you have to think ahead to keep your scenes optimized.
My mistake was that I intended for our Floor_Plan.usda file to represent the original CAD design. What I should have done before creating the variants was add a new sublayer to store our changes. Before we do that, let’s clean things up
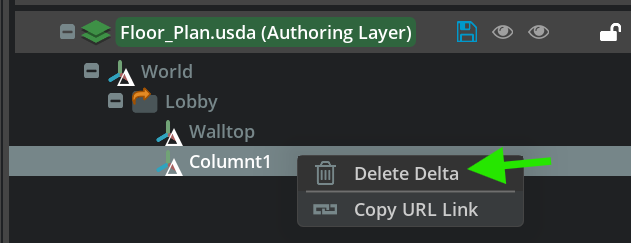
Right-click our Columnt1 Xform and select Edit Variants. Right-click the Style variant set and delete it.
The last thing we should do to keep our scene clean is delete the Column1 sublayer from our Floorplan_usda layer by right-clicking it and selecting “Delete Delta”.
I’ll let you decide if you want to keep the Walltop change in this layer, but I’m going to keep it for this exercise since we want our columns visible through this project. That decision may be different in a real-world project.
Now that the mistake is gone, let’s do this right.
Don’t forget to save your project!
The Proper Way to Manage Variants
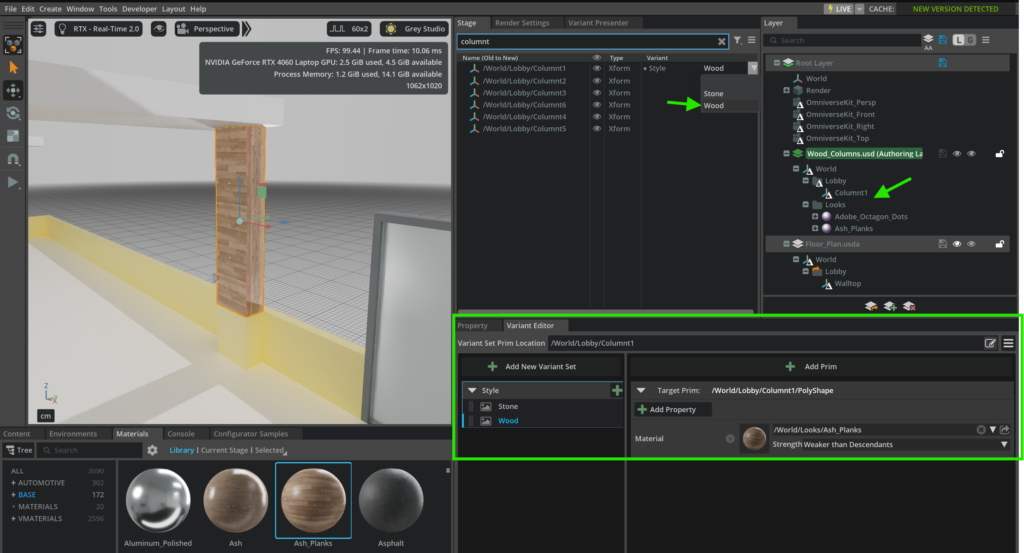
Right-click the Root Layer and add a new sublayer and save it as Wood_Columns.usd.
Right-click that new layer and set it as the Authoring Layer.
Now, we’re ready to go back through the process of adding our Variant Set to Columnt1.
See if you can do this without going back to the previous steps we took above. They’re always there if you get stuck.
Here’s a screenshot showing how everything should look once you’re done, with Columnt1’s variant dropdown to select Stone or Wood, our Wood_Columns.usd layer should have the Columnt1 changes with an additional Looks sublayer that stores our materials. Since this is the wood specific layer, be sure to select the Wood variant for this column.
That wasn’t so bad, right? I always find that mistakes and repetitive tasks help me solidify in my understanding of how systems work, no matter what I’m learning.
Confirm We’re On Track
To prove to ourselves that we’re on the right track, let’s do a quick test.
In the Layers panel, one might think that we can hide our wood variant and show the original by simply clicking the eye icon, but that’s not how things work with USD. We’re not allowed to hide a layer in Authoring mode, so we need to right-click the Root Layer and set that as our Authoring Layer.
Now, we can mute the Wood_Column layer to hide our opinion and show the original column style.
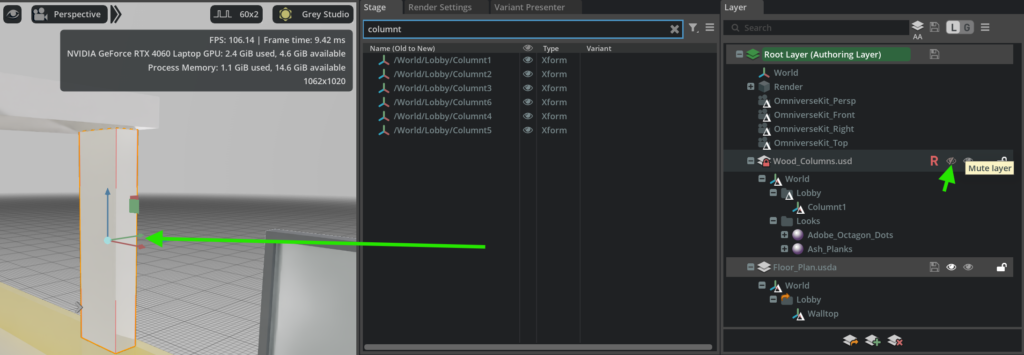
This proves that the mistake has been fixed and that we’re able to see exactly what we’d expect. This ability to mute style layers will become our simple option for reviewers to turn style proposals on and off as they do their evaluation later on in the workflow.
All we need to do now, is repeat the process of adding variants to the other 5 columns. But…
Be Careful!
Our plan will fall apart if we start creating our variants with our Root Layer set as the Authoring Layer, so be sure to set the Wood_Colums back to our Authoring Layer before we go through all that work.

This has been the hardest part of learning USD. As awesome as it is, you must follow specific rules in order for it to be amazing.
Now, we can run through the repetitive process of setting up our variants on the remaining 5 columns.
One Other Note About Instancing
In a pure USD scenario, like you see in the Fundamentals of Working with OpenUSD lesson, you’d be able to save a prim as a USD file and apply the variant to that and bring that new file into your main project instanced, so applying the variant to one asset automatically makes it available in all instances. You see that in the Welding Lockers in that lesson plan.
Unfortunately, we’re not able to do that here due to this originating from a CAD JT file, plus our columns aren’t all exactly the same. There’s enough difference between them that approach simply doesn’t work. So, we need to apply the variant set to each column manually in our case.
Status Check
Were you able to do that by memory without having to go back through the steps? If so, you’re becoming a variant boss!
Once you’re done setting up each column with it’s variants, you’ll not only have built some muscle memory, you’ll have completed the hardest part of setting this up. Here’s a screenshot showing all 5 columns with their wood styling in place.

Now, we’re ready to jump to setting up the Stone variations.
Stone Column Layer
Can you’ guess what we’ll need to do next?
Yep, we’ll need to create a new sublayer to represent the proposed stone style variation, so it can be toggled on and off to effect every column with one click!
Right-click our Root Layer and create a sublayer named Stone_Columns.usd.
Be sure to set Stone_Columns as the Authoring Layer, so our changes apply to it.
This next step is the easy part! Simply change the style variant for each column to Stone and save the file.
Here’s a screenshot showing where we are now. We have our stone layer set up so all the columns have the proper style set.
The Final Style Variant Test
It’s time to see the fruits of our labor and the power of OpenUSD’s LIVERPS!
Start by setting the Root Layer as the Authoring Layer. To make this easier to see, you can collapse our sublayers.
If you mute the stone layer, you can see all the columns turn to wood.

Muting the wood layer brings back the original CAD design.

Some room for improvement in this approach would be to correct the fact that we must have the wood layer on to see the stone layer even when it’s not muted. You can see below that we’re still seeing the original style.

That’s where it’s useful to understand the LIVERPS seniority rules for USD.
This wasn’t a problem with the welding locker’s referenced approach in the USD Fundamentals learning path, so this is most likely caused by setting up the variants on the Wood_Columns layer. Since that layer is muted, our Stone_Columns layer can’t access them. Simply unmute the wood layer and you’ll see the stone again.
In this example project it has little impact, but it’s important to keep this in mind in a production scenario. I corrected this issue in the video I made for this project at the bottom of this article.
Managing Structural Integrity
So far, we’ve been setting up our scene while wearing our designer hat. But what if a designer, or architect, wanted to move a column so they can improve the view out a window.
In some cases that might be ok. But, what if that particular column was load-bearing? How is the designer supposed to know?
Let’s put our structural engineer hat back on to see if we can reduce the chances of someone making a mistake that could bring our building down.
Creating an Omniverse Kit Extension
This is where we’ll enhance the user’s experience beyond relying solely on knowledge of layer strength ordering through LIVERPS by creating an extension that alerts the user that they aren’t allowed to move our load-bearing columns.
This won’t be a complete guide to creating an extension, but we’ll provide enough of an overview to get it up and running.
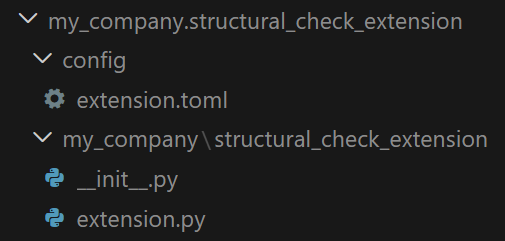
Move over to the Kit App Template repo under the “source\extensions” directory where we’ll create our custom extension.
Folder structures are a critical part of creating extensions. It starts with the main extension folder name with dots to reflect the Python folder paths.
In our case, we’ll create an extension folder named “my_company.structural_check_extension”.
Next, add a subfolder named “config”, which is where we’ll add an “extension.toml” file that looks like this:
[package]
title = "My Structural Check Extension"
version = "0.1.0"  # Semantic Versioning is used: https://semver.org/
description = "Let people know when they shouldn't mess with structural prims."
category = "Reminder"  # How to categorize this in the Extension Manager


[dependencies]
"omni.usd" = {}
"omni.kit.notification_manager" = {}


[[python.module]]
name = "my_company.structural_check_extension"
Now, we can add a sibling folder that matches our main extension folder’s prefix by calling it “my_company”.
Under that, we add another folder called “structural_check_extension”. This is where our Python code lives, so you can add an “__init__.py” file that declares our script with nothing more than from .extension import StructuralGuardExtension in it.
Finally, we can create our Python script in a file named “extension.py”, which includes the following code:
import omni.ext
import omni.usd
import omni.kit.notification_manager as nm
from pxr import Usd, Tf
import time


class StructuralGuardExtension(omni.ext.IExt):

    def on_startup(self, ext_id):

        self._last_alert_time = 0
        stage = omni.usd.get_context().get_stage()

        self._listener = Tf.Notice.Register(
            Usd.Notice.ObjectsChanged,
            self._on_objects_changed,
            stage
        )

        nm.post_notification(
            "Structural Guard Active",
            status=nm.NotificationStatus.INFO
        )

    def _on_objects_changed(self, notice, stage):

        if not stage:
            return

        now = time.time()

        if now - self._last_alert_time < 2:
            return

        try:
            for path in notice.GetChangedInfoOnlyPaths():

                p = str(path).lower()

                # Only react to transform operations
                if "xformop:" not in p:
                    continue

                prim_path = path.GetPrimPath()

                if not prim_path:
                    continue

                prim = stage.GetPrimAtPath(prim_path)

                if not prim:
                    continue

                # Check for structural attribute
                attr = prim.GetAttribute("structural:protected")

                if not (attr and attr.Get()):
                    continue

                prim_str = str(prim_path)

                self._last_alert_time = now

                print(f"Structural movement detected: {prim_str}")

                nm.post_notification(
                    f"Structural element moved: {prim_str} | Check LIVERPS authority before editing.",
                    status=nm.NotificationStatus.WARNING,
                    duration=3
                )

                break

        except Exception as e:
            print(f"[Structural Guard ERROR]: {e}")

    def on_shutdown(self):

        if self._listener:
            self._listener.Revoke()
            self._listener = None
You can see on line 56 that we’re using the custom attribute we created to help us know when to show a toast message once a user moves it with prim.GetAttribute("structural:protected"). We just listen for “xformop:” to specifically target transforms so users can still adjust things like materials.
Here’s how our final extension folder structure looks:
Add Our Extension to USD Composer
To ensure our extension loads in our application, we need to ensure it’s set as a dependency of USD Composer by adding "my_company.structural_check_extension" = {} under the [dependencies] list in the file located at source\apps\my_company.my_usd_composer.kit. You may need to adjust the name and path based on your project.
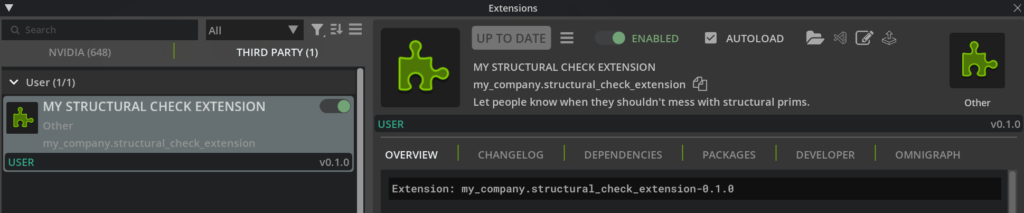
Next, rebuild your app template and start it. Once it’s running, you can navigate to the top menu and open Developer > Extensions to show the extensions window. You should see it’s already enabled under the “THIRD PARTY” tab.
Here’s how our extension looks in the Extensions window of USD Composer.
If you open up our “Structural_Demo.usda” file and move a column, you’ll see a warning like this:
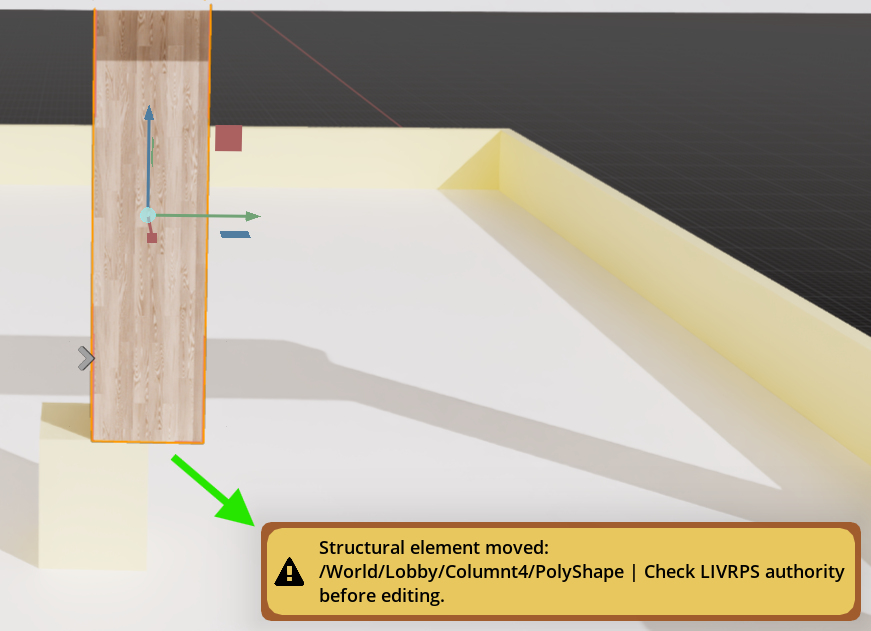
This approach allows us to inform users of constraints while retaining the non-destructive nature of USD.
Deployments
While we built this prototype using the USD Composer template, the real power of the Omniverse Kit SDK is the ability to containerize these features. By bundling a custom application into a Docker image, you can deploy a consistent, high-performance environment to global teams via Kubernetes. While infrastructure needs vary by organization, moving to a containerized microservice architecture is the definitive next step for taking a CAD-to-USD pipeline into a production-grade, enterprise environment.
Key Takeaways
LIVERPS is Your Safety Net: Understanding OpenUSD layer strength (Local, Inherits, Variants, Relocates, References, Payloads, Specializes) allows for non-destructive design “opinions” without ever breaking the original CAD source of truth.
Catching Mistakes in Real-Time: Instead of waiting for an engineer to reject a design later, our Kit Extension provides immediate feedback. This keeps the creative flow moving without risking structural integrity.
Metadata = Smarter Assets: By tagging prims with custom attributes like structural:protected, we turn static geometry into intent-aware assets that our code can monitor and protect.
Layer Discipline is Key: Success in USD requires staying mindful of your Authoring Layer. A few seconds spent verifying your active layer prevents hours of cleaning up “mistakes” in the hierarchy later.
Ready for the Enterprise: This workflow is ready to scale. Moving this into containerized microservices ensures global teams can maintain the same guardrails across any infrastructure.
YouTube Video
I’ve created a YouTube video going through this whole process:
Additional Learning Resources
NVIDIA Learning Paths:
Introduction to Developing With NVIDIA Omniverse
Fundamentals of Working with OpenUSD
NVIDIA Tech Blog & OpenUSD Insider Series
NVIDIA CAD to USD Workflows Technical Blog and this video: