I recently invested in an Akai MPK Plus midi controller, which came with one of three Native Instruments Komplete Select 15 bundles, so I chose the Electronic bundle. If you’re not looking to spend any money to get started, you can download Native Instrument’s Komplete Start bundle. Then, you can get the Waveform Free DAW (Digital Audio Workstation) and start making music for free!
In this article I’ll provide an overview of how I set up my midi controller and free VST instruments to work with Waveform Free. Then, I’ll share details about how I’m studying up to get good an making my own music, which I hope helps inspire others who are interested in making music to give it a shot. No investment required!
Once I have music worth sharing, I’ll be using RouteNote to copyright and distribute my work to streaming services like YouTube Music, Apple Music, Spotify, and more. That will be a separate article, where I’ll share everything I’ve learned along the way – just like I am here.
Project Intro
I’ve been playing a variety of physical instruments for as long as I’ve been working with technology, over 40 years. Combining the two has me inspired to see if I can produce anything worthwhile and possibly use it to build passive income streams. Keep in mind that is a goal – not an expectation. Making money would be nice, but I’m mainly interested in formal ownership of my music as an artist.
Of course, I’ve explored using AI to generate music, but it’s not feasible to do locally with a consumer grade 8GB GPU. Plus, even if you use an AI music service, you start to notice the lack of creativity in AI generation over time. Yes, AI can make some great tunes, but it can’t replace the spirit behind the process of making music that you really feel. I’m thankful for the life experience that helped me realize that!
I’ve also been including background music in some of my recent YouTube videos, which is another reason for this project. I’d like more control over the music I use in my videos, plus it’s been tricky to share audio reactivity projects using music I don’t own. This project will lead to me having far more control, but it’s going to require some dedication due do me having to learn a lot.
As always, that’s what these projects are all about – gaining skills that help me achieve bigger long-term goals.
If you subscribe to my blog, or my YouTube channel, you can follow along and watch everything come together!
Midi Controller & Instrument Set-up
One might think you can just plug in a USB cable to get up and running, but that’s not the case here.
If you’re not using midi hardware, you can simply use the windows midi device, or “draw” midi notes on your track. You’ll still need to setup instruments!
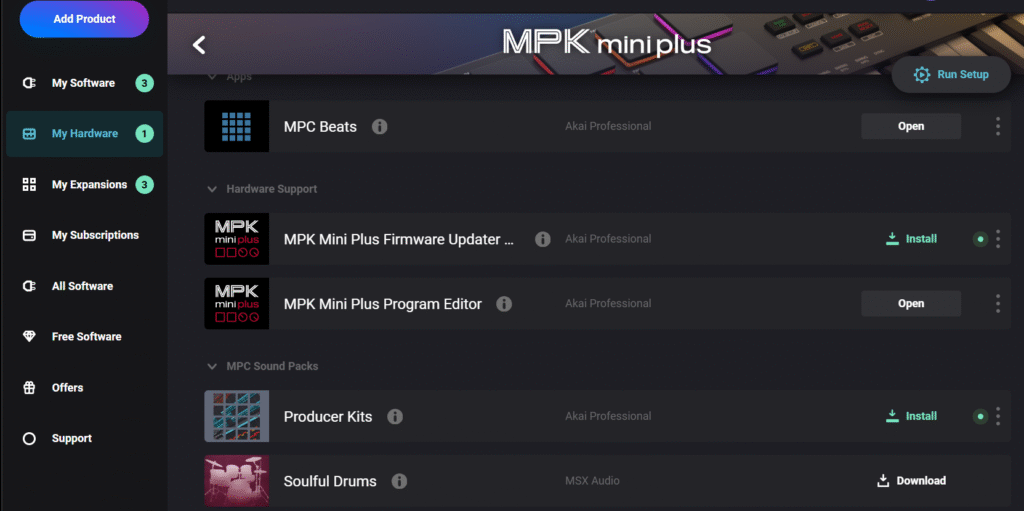
I went through the Akai registration process for my MPK Mini Plus, downloaded the InMusic software to update my firmware and install MPC Beats, along with a couple of basic keyboard plug-ins. Getting MPC Beats to play a keyboard instrument was pretty straight forward if you launch one of their templates. That was great to ensure my keyboard worked.
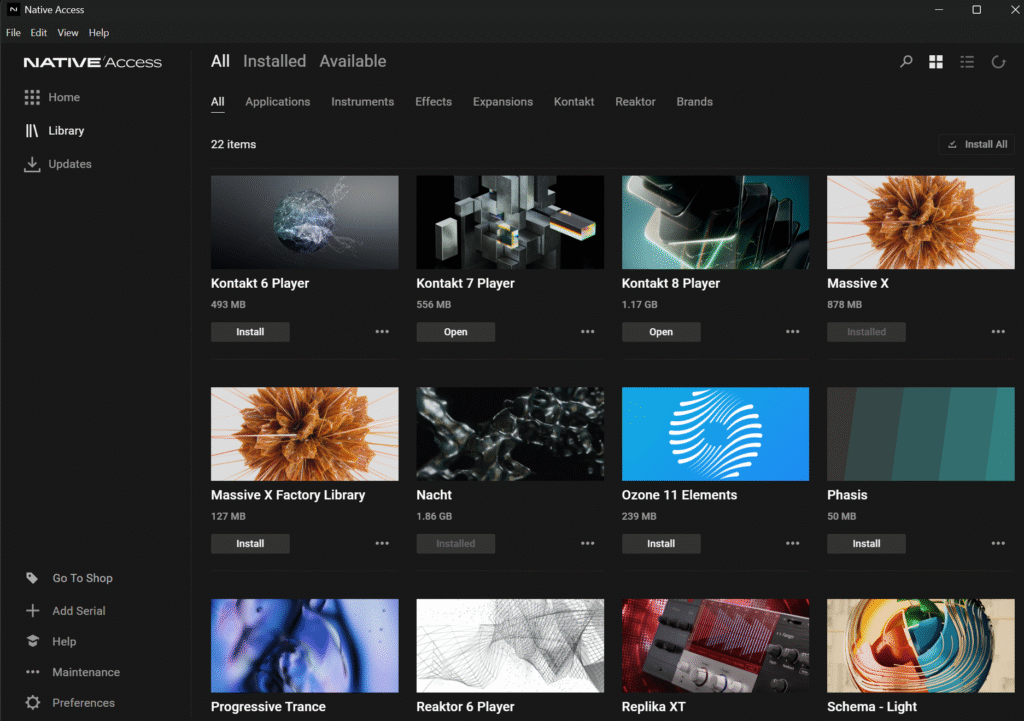
After moving on to redeeming and installing my free bundle with the Native Access software and getting Kontakt 8 Player installed , I found myself a bit confused. I’d press a key and nothing would play. I thought Kontakt 8 was a standalone player. I’m still learning, so maybe I missed something.
Turns out I needed to use Komplete Kontrol in order to automatically map my controller using the NKS integration provided by Akai by clicking the MIDI text button in the upper right corner. I double clicked my controller to see it’s name replace that MIDI text, and it said my controller was mapped.

Once I did that, I still needed to update my preferences to use the right audio device to hear my music and make sure my controller is selected.


After that, I was able to double click one of my instrument presets and wait for the instrument to load. That took longer than I expected, even after upgrading to 32GB of RAM! If you’re not patient, like me, opening an instrument for the first time can get confusing.

Once I did all that, I was able to hit a single key and see midi signals in the upper right and hear sound!
Fixing Control Knob Issues
One of the biggest challenges I finally found a solution for, thanks to GPT, was that my controller’s knobs weren’t covering the full range of the instrument macros (the dial parameters at the top of the image above). They would jump from 0.78% to 100%, which made them useless!
I learned that I needed to use the Mini Plus Editor to adjust each knob’s settings to use an absolute value.
Once I opened the editor, I selected “get” – “program 1”. I adjusted each knob to be “ABSOLUTE” and changed the program name to “WAVEFORM”. Then, send that back to the controller.
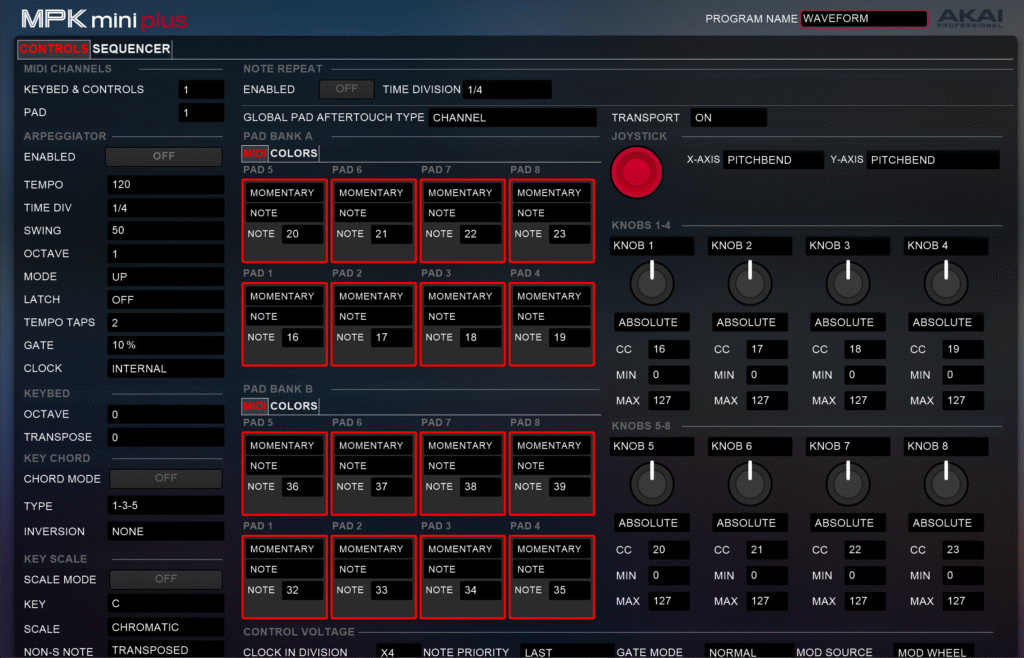
Once that was done, I just needed to relaunch the program by pressing the “program select” button and hitting the fist drum pad to reload program 1.
Now my knobs are working and allowing me to dial my parameters in real-time and my controller says my DAW’s name! Super cool 😎
Waveform Free
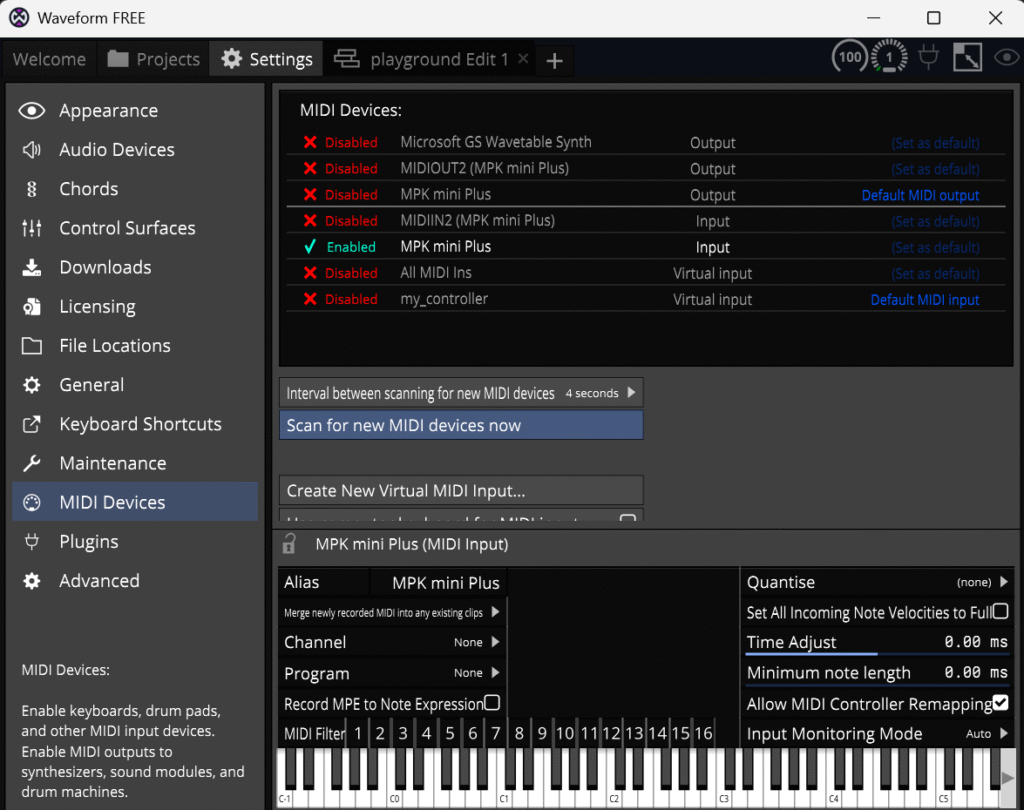
Moving over to Waveform left me with nothing again, until I learned to load Komplete Kontrol as an instrument on an empty track, enable my controller as an input, and arm the track to hear anything. Once I did all that, I was finally able to push record and see midi notes in my track!
There’s also some info on the NI site.
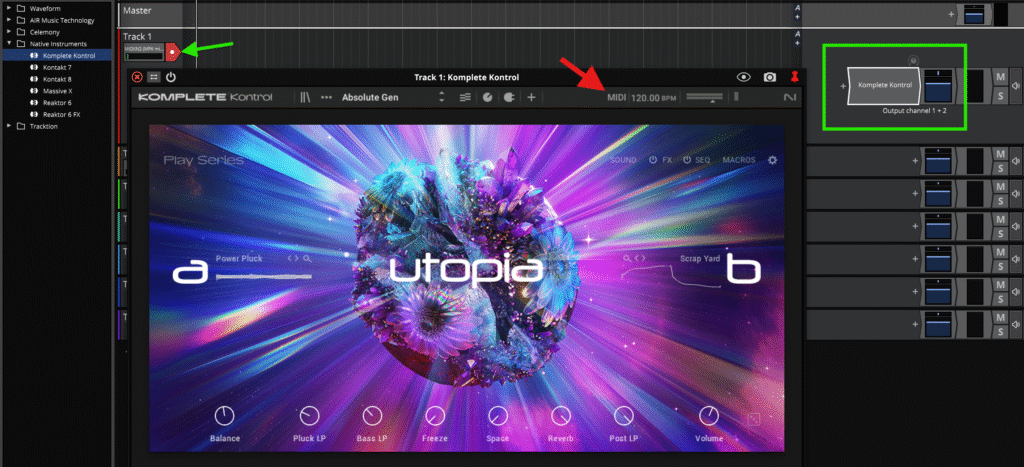
Once I saved my project, I was able to open it in Waveform with everything as I left it!
Finding My Sound
Now that I have everything setup, it’s time for what I hope to be the best part. Finding my sound! I listen to electronic music a lot, and one thing that’s clear is that my favorite artists have their own sound.
Now is the time that I’ll download the Komplete Start bundle to have all my instruments in place and ready for me to start exploring.
Once I have that, I’ll go through the Native Instruments Quick Start Guide, which includes details on finding your sound and creating your first track. Here’s a great video that emphasizes why this is going to take some time as you shape sounds to meet your auditory vision.
Here’s another video that’s a great example of how you can stack instruments to get a great sound!
I also ran into this NI video on how to use KOMPLETE KONTROL, which seems like a great resource to share here!
After understanding how to work with instruments in general, I found myself wanting more control over drums. This video about working with Battery was a lot of help!
I really like TRK01 for creating some slick rhythms, but it was not clear how to control what plays and when until I finally found this video!
Personal Tip
Once you finally start finding you’re sound, you want to make it easy to come back to.
I know that Native Instruments allows you to save presets, which I’ve done – especially custom drum kits mapped to my midi pads. But, I also save my instruments in a Waveform project template. That way I can easily kick off the music making process without starting all over.
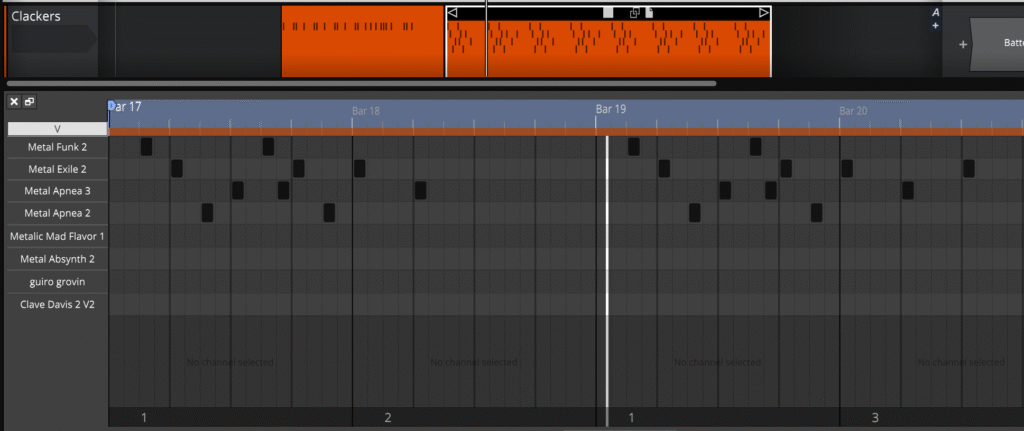
Here’s an example of me creating a step clip based on a custom drum kit I made, which is super handy!
I’ll go over details around how all that works in the YouTube video I’ll be making soon, which I’ll share here. It’s a bit much to follow in a written article!
From Loops to Arrangements
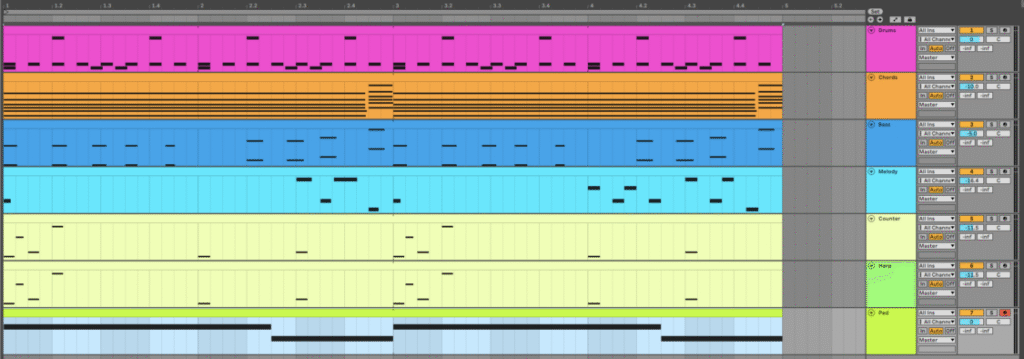
While learning how to work with the different instruments in Waveform, I stuck with creating simple loops so I could easily explore what sounds and rhythms work well together. My assumption is that I’d be able to separate out the layers to build an arrangement.
That’s exactly how this Native Instruments article started off!
Then they shifted everything around to make it an arrangement, which is exactly what I was aiming for!
Look how simple that is and how great it sounds!
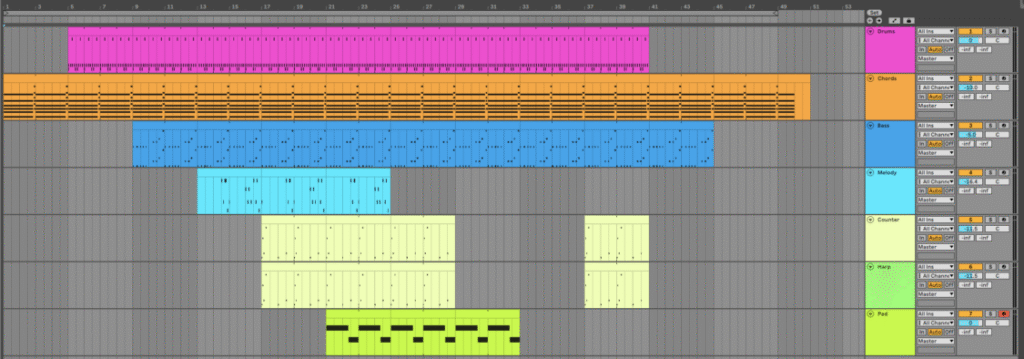
We keep the arrangement interesting by adding or removing elements every four bars, which prevents it from sounding too repetitive, and allows us to showcase different combinations of parts.
That’s the perfect progression for how I’ve been learning!
Cord Progressions
Cord progressions are a major part of making anything worth listening to! They also make it much easier to develop a song you can take pride in.
Thats where the circle of fifths becomes you best friend! It’s essentially a color wheel for music.
This video does an awesome job of explaining how it works and demonstrates the difference it can make as you develop you own music.
With that understanding, it’s time to think about making melodies!
Refining Your Sound
When it comes time to tighten up your sound you can take advantage of the free Ozone 11 EQ to soften harsh highs or bring more attention to a dynamic lows.
Once again NI helps you learn how:
I find it awesome how loading the Ozone 11 Elements plug-in kicks off and AI evaluation which results in a recommended starting point. This is perfect if you’re not sure exactly what adjustments to set. Ozone 11 Elements came with the Komplete 15 electronic bundle, which may require some type of purchase. Waveform free has a free equalizer too, so don’t worry if you’re not investing anything yet.
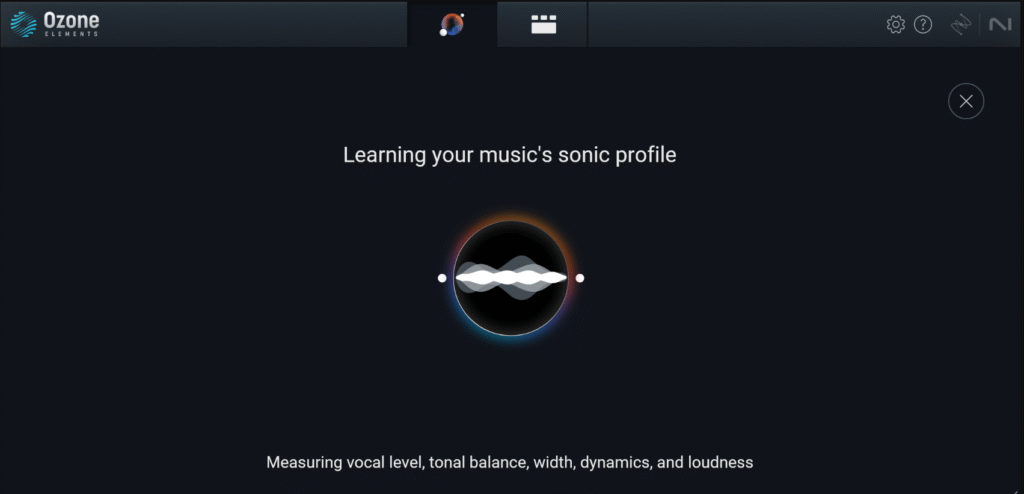
You can place it on a single instrument, or add it it to the master track to optimize the entire arrangement!
Here’s another great video for using Ozone that felt worth sharing:
If you were questioning how making music fits into a tech blog, and the setup of all this didn’t do the trick, those two videos ought to bring that home for ya! 🤓
Audiophiles are some of the nerdiest nerds I’ve ever known!
Sound can be compared to wine, in my opinion. Finding the nuances may be something you can learn, but I’m a firm believer that not everyone has the physical hardware to support appreciating those nuances due to dulled senses.
Synthesizers bring in another level of technical complexity, which I share in my article about Massive X
Understanding Audio Dimensions
While on this journey, I ran into what feels like THE MOST IMPORTANT lesson in creating music that I have learned yet!
That is all thanks to the following video, which covers how important the time consuming and mundane process of finding the right sound is, but also how to think about soud dimensions and how they feel in a room.
I’ll be watching this video multiple times to help guide me towards developing high quality music productions rather than my typical flat tunes.
Analyze How Experts Think and Work
Whenever I’m learning new technology, I’ve found myself drawn to listening to experts as they discuss their craft to see what I can glean from the language they use and what they talk about. Eventually, I’m able to understand and speak their language! This has been the case with ANY technology for me.
This next video is a perfect example. Listening to Deadmau5 and Steve Duda discuss the mastering process gave me new insight that helped me not only understand how concert speaker stacks differ from home systems when it comes to lower frequencies, but it also got me to explore how compressors and limiters help me reduce unwanted noise that I was running into as I add more layers.
Don’t Give Up!
All that seems great, but let’s be honest, this is not easy! Don’t let the fact that you aren’t a fan of what your making get you down. Like anything new your learning, you must put in the time and effort to build the skills and intuition needed to support the creative process of making music. If that’s what you’re passionate about, it will be worth sticking with it!
Be grateful for the honest feedback you get from others, and learn from it. Apply that knowledge to your next track, and keep iterating. And when you break down and cry after finally hearing the words, “You made that?! That was cool!” — just let the tears fly, because you deserve to let it all out after all your hard work!
If you want to learn how to not give a rip, and make music because you enjoy it, I highly recommend checking out one of my favorite YouTubers who made this amazing video that gets to the point of anything we do creatively.
He’s also a great resource for free VSTs!
On a different note (punny!), Native Instruments also has a great article where they interview an artist behind famous tracks that digs in to inspire you – How to find your sound: Bluey Thomas on finding your vibe without breaking the bank.
Here’s a quote from that article that aligns perfectly with where I am as I write this, which is trying to re-create existing music that I like to help me learn:
Something that has really helped me find a sound was re-creating some of my favorite songs – or at least trying to, and failing. From there, I often found myself changing things to fit my liking or even unintentionally doing something different which left me with a more unique sound.
Talk about perfect timing to help keep me from falling into a funk! That article solidified that I’m right where I’m supposed to be. Failing is part of the process and practice, which I tend to despise, is critical. Especially in making music – unless you’re lucky and born with natural talent. I’ve always been lucky enough to replicate the notes that I hear in other songs I like, but adding that perfect sound in the mix has not been easy. But, I’m getting there.
Now that you have everything you need at your fingertips, it just a matter of sticking with it until you find your groove (pun totally intended). 🎵 😉
Be sure to subscribe to see where all this is going and how my music will be used in my future projects.
I hope sharing how I’m working through this myself has been helpful and inspiring!
Stay tuned for details on how I’m moving forward from this point! Making the music is only a part of everything that needs to come together before I can claim to be an Indie Music Artist!
Today, I uploaded my first track to be distributed on all the major music platforms, so I’ll be sharing that whole process (and the song) very soon!
UPDATE
I woke up this morning with an approval of my first track in my inbox!

I believe that makes me an official indie music artist 🎉
It took about 4 weeks and I was a little bummed to learn about the YouTube Content ID limitation, but this is still a major milestone. I read the article they provided and learned that it’s likely due to a sample I used – or possibly I didn’t adjust the LFO enough in Massive X – or something along those lines. I’ll dig in to how to avoid that and will be sharing what I learn in case others find the details valuable.
Either way – this is a big step for me and will add the song here once it’s available on YouTube Music, which could take another 2 weeks.


