Out of all the technical projects I work on, I always find myself coming back to using technology for some form of art. Lately, it’s safe to say that I’m obsessed with using AI to generate art even though some have ethical concerns, which I completely understand. My first experience with SDXL 1.0 was on the publicly hosted Web UI, but that went away giving me the perfect excuse to spend some time getting set up to run Stable Diffusion with Automatic1111 on Windows 11.
Being both a Research Engineer and an artist at my core, learning how to run Stable Diffusion with Automatic1111 has been an amazing way for me to enjoy exploring how image generation works. Not to mention that fact that I absolutely love some of the results, which you’ll see below.
For many, this may not feel like “art”.
I personally feel the act of crafting a prompt with the right parameters to generate a good quality image is in itself an art. I hope this article helps explain why.
My Former Art Career
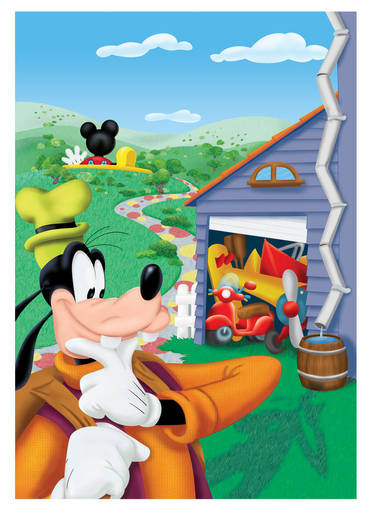
Since most of my blog relates to technology, I’ll prove the artist side of me by sharing my first (and only) published illustration from page #1 of Disney’s “Go, Goofy, Go“.
This was a dream come true for me, since I always practiced drawing as a kid hoping one day I’d draw for Disney.
Unfortunately, I’m a slow illustrator due to my inability to see past imperfections. That meant it was tough for me to make a decent living with art alone.
My job, at the time, was to digitally “ink” the final sketch in Illustrator so my boss could paint it in Photoshop. In this case, he let me do both ink and paint!
How to Install Stable Diffusion on Windows
I originally started off by following the directions on Automatic1111’s GitHub repo for Stable Diffusion Web UI and trying to get it installed on my first go at WSL Ubuntu. Unfortunately, the app kept crashing. I thought it could be that WSL wasn’t recognizing my NVIDIA RTX 4060 GPU.
From there I decided to just install directly on Windows 11, which is when I stumbled across the article How to install Stable Diffusion on Windows (AUTOMATIC1111) at Stable Diffusion Art. It was a clear and comprehensive guide, so I figured I’d follow those instructions, rather than trying to follow the previously failed approach.
I’m working on my new laptop, so I followed the 5 installation steps and had Stable Diffusion up and running in no time!
- Step 1: Install python
- Step 2: Install git
- Step 3: Clone web-ui
- Step 4: Download a model file
- Step 5: Run webui
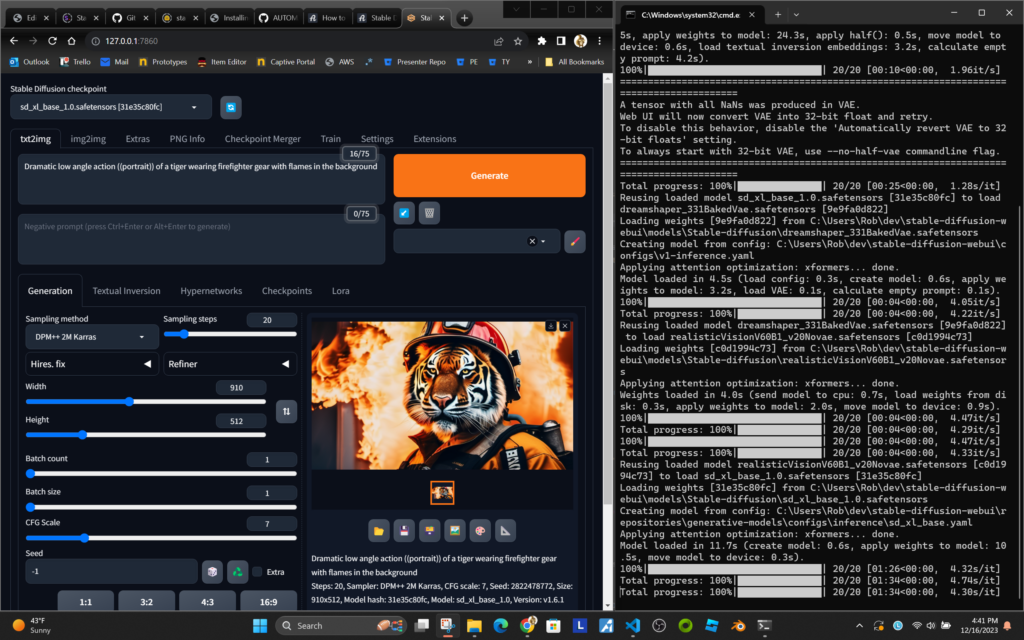
Here’s a screenshot of Automatic1111’s Web UI Running on my laptop with the terminal that runs in the background visible on the right.
Desktop Web UI with Terminal:
Mobile:
I always prefer to use my phone when I’m playing around, so I don’t feel like I’m “working” with my laptop in front of me.
So, I made sure to add the argument –listen to the webui-user.bat file, which allows me to access Stable Diffusion from my phone while my laptop’s GPU does all the work.
set COMMANDLINE_ARGS=--listenTo do that, simply edit the file and add the above argument.
Since I got all that working, my go-to site for learning about Stable Diffusion has been Stable Diffusion Art! Andrew provides great resources and digs DEEP into the realm of AI generated art. Including how Stable Diffusion works. His site has been an inspiration for how the site is set up, and the type of audience he’s built, with around 10,000 views per week on new articles.
Automatic1111’s Docs Are Still Great
Even though I ran into issues with my first attempt at using Automatic111’s docs to run Web UI locally, I still find their Feature Showcase has tons of useful information. I especially love the section on Attention/Emphasis! At some point, I may run through their process again without trying to use WSL to see if that works better. At the time, I noticed a build error on their repo, which has since been resolved with the latest commit. For now, lets dig into some of the things I’ve been learning.
Size DOES Matter!
I was shocked to see how poorly an image can turn out just by using the wrong size or aspect ratio for a particular model.
Some models require aspect ratios based on 512 x 512, while the native size for SDXL is 1024×1024. Different aspect ratios are supported but the quality is sensitive to size. This is a list of the image sizes used in DreamStudio, Stability AI’s official image generator:
- 1:1 – 1024 x 1024
- 5:4 – 1152 x 896
- 3:2 – 1216 x 832
- 16:9 – 1344 x 768
- 21:9 – 1536 x 640
I ended up installing the Aspect Ratio Selector extension so I could configure the sizes I want and set them with the click of a button.

I installed a few other extensions, but don’t plan to dig into them here.
Performance
Performance can vary based on the model, like sdxl_base_1.0 and can take 2-4 minutes, while dreamshaper and realistic can take 20-40 seconds.
Obviously size matters here too. Things go much quicker when you run 512 x 512 images, but as you can see in the image below, my RTX 4060 GPU with 8Gig of VRAM is almost maxed out with a 1344 x 768 image! Soon, I plan to try NVIDA’s TensorRT new extension to see how much helps
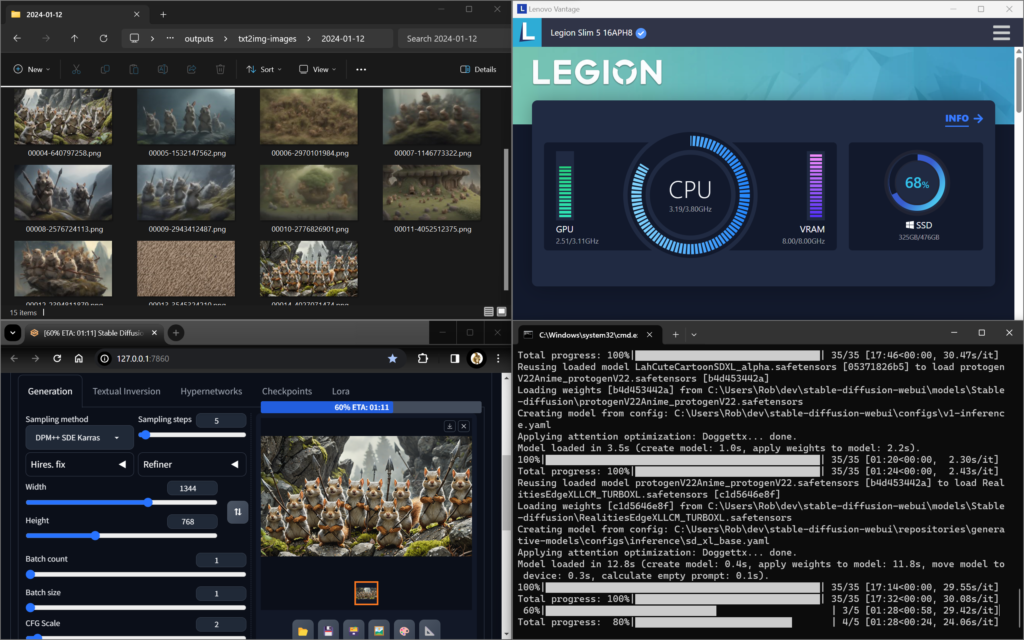
Bottom Left = Web UI; Bottom Right = Web UI Terminal Displaying Processes
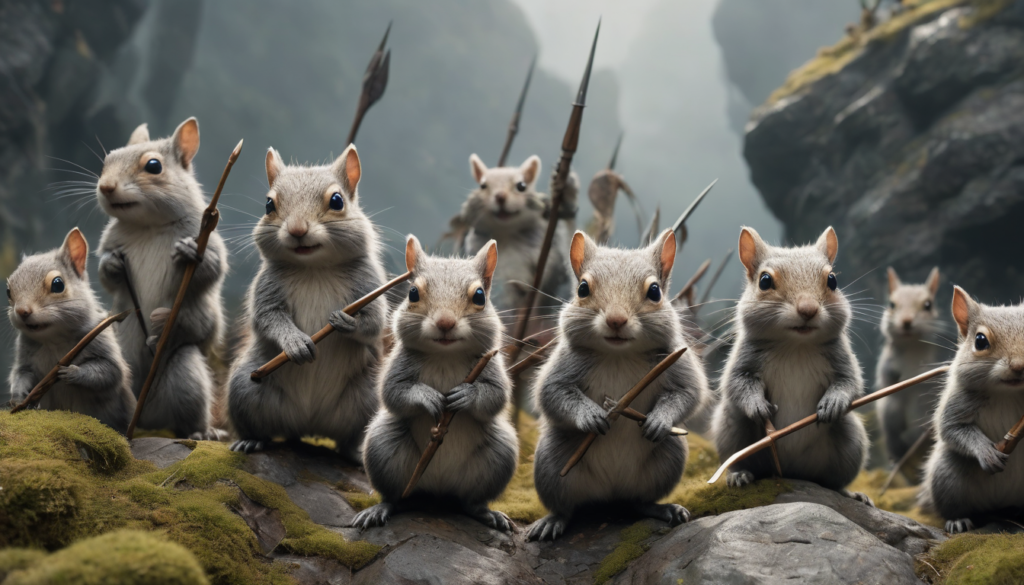
Prompts and Models
I fell in love with this little fella when researching different models! I took the parameters provided and was able to successfully re-create him. I know the “seed” is critical for replicating an image (in his case: 2065889259), but I also learned that the sampling method is helpful. Using a sampling method with an ‘a’ at the end means an image will be harder to reproduce.
We’re going to use him as our theme for the rest of this article!
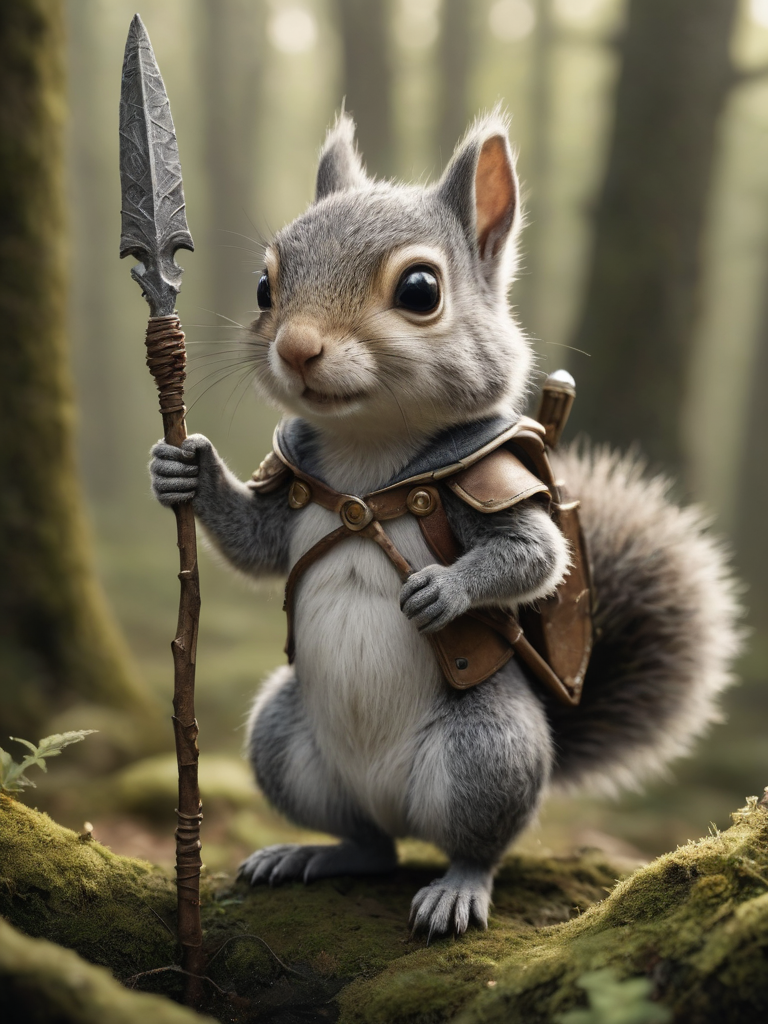
Here are the parameters used to create him:
Prompt: macro camera, illustration of a little magical cute forest creature. The creature IS holding a spear. fantasy art, intricate details, style Jean – Baptiste Monge, style Alan Lee, anthropomorphic squirrel , scene from a movie, dramatic shot angle, atmospheric particles, Real, raw cinematic photorealism, action portrait, 8k, detailed, centered, full frame, depth of field
Negative prompt: ugly, tiling, poorly drawn hands, poorly drawn feet, poorly drawn face, out of frame, extra limbs, body out of frame, blurry, bad anatomy, blurred, watermark, grainy, signature, cut off, draft, closed eyes, text, logo
Steps: 5, Size: 768×1024, Seed: 2065889259, Model: DreamShaperXL_Turbo_dpmppSdeKarras_half_pruned, Version: v1.6.0-2-g4afaaf8a, Sampler: DPM++ SDE Karras, CFG scale: 2, Model hash: fff4b552bf, Hires steps: 10, Hires upscale: 1.5, Hires upscaler: 8x_NMKD-Superscale_150000_G, Denoising strength: 0.45
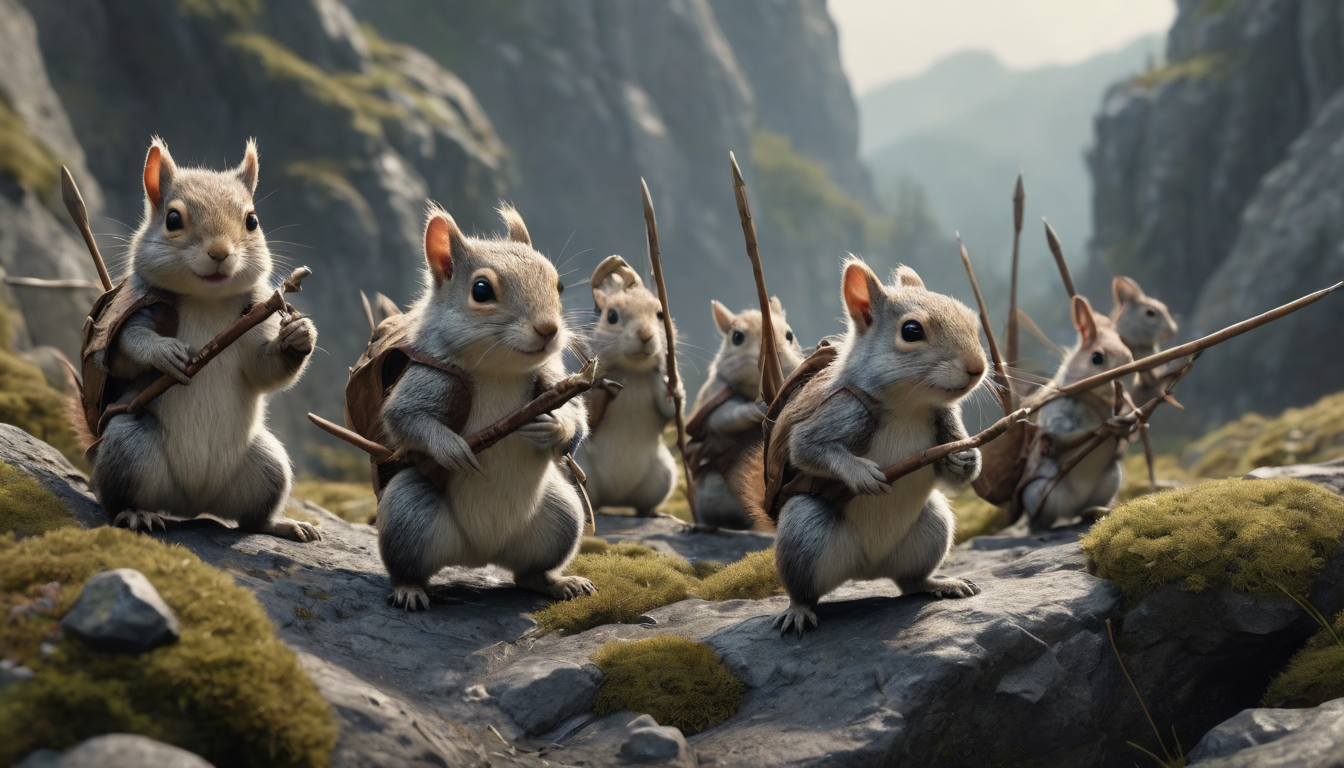
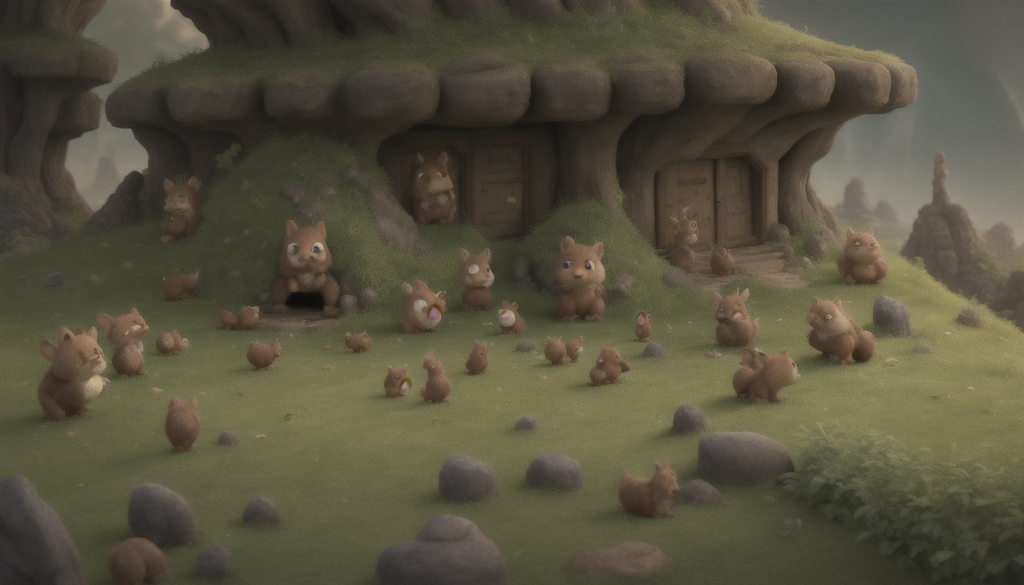
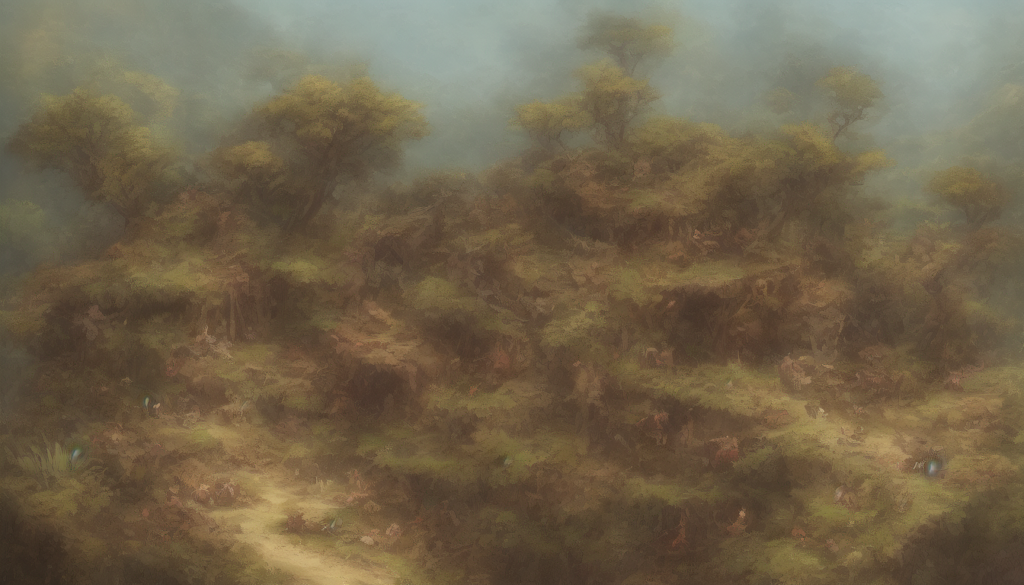
Header Image
I’ve been using Stable Diffusion to generate the header images for my articles, so I figured this would be a good time to explore a different aspect ratio using the same general settings as the little fella above, only to fill the wider space I call for an ARMY of them! 😍

Prompt: macro camera, illustration of an army of little magical cute forest creatures defending their home in a rocky hill side. The creatures ARE holding spears. fantasy art, intricate details, style Jean – Baptiste Monge, style Alan Lee, anthropomorphic squirrel , scene from a movie, dramatic shot angle, atmospheric particles, Real, raw cinematic photorealism, action portrait, 8k, detailed, centered, full frame, depth of field
Negative prompt: ugly, tiling, poorly drawn hands, poorly drawn feet, poorly drawn face, out of frame, extra limbs, body out of frame, blurry, bad anatomy, blurred, watermark, grainy, signature, cut off, draft, closed eyes, text, logo, same expression
Steps: 5, Sampler: DPM++ SDE Karras, CFG scale: 2, Seed: 73636407, Size: 1344×768, Model hash: 676f0d60c8, Model: dreamshaperXL_turboDpmppSDE, Style Selector Enabled: True, Style Selector Randomize: False, Style Selector Style: base, Version: v1.6.1
Time taken: 2 min. 37.5 sec.
A: 10.22 GB, R: 12.86 GB, Sys: 8.0/7.99609 GB (100.0%)
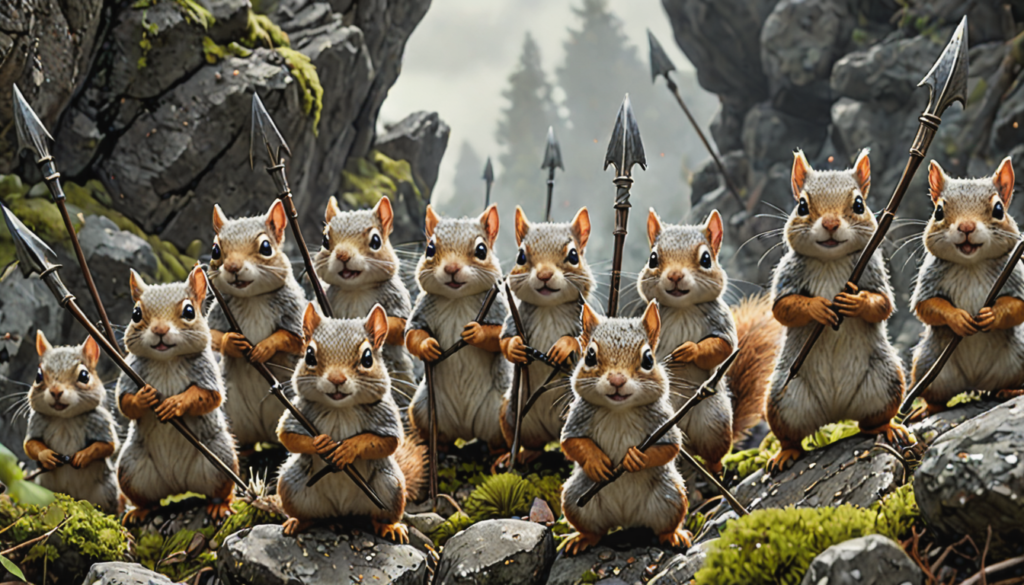
Results: Testing the Same Parameters With Different Models
Here are 7 other models tested with the exact same parameters used in the header image (above). The results are interesting, and in some cases, very underwhelming.
 Model: RealitiesEdgeXLLCM_TURBOXL


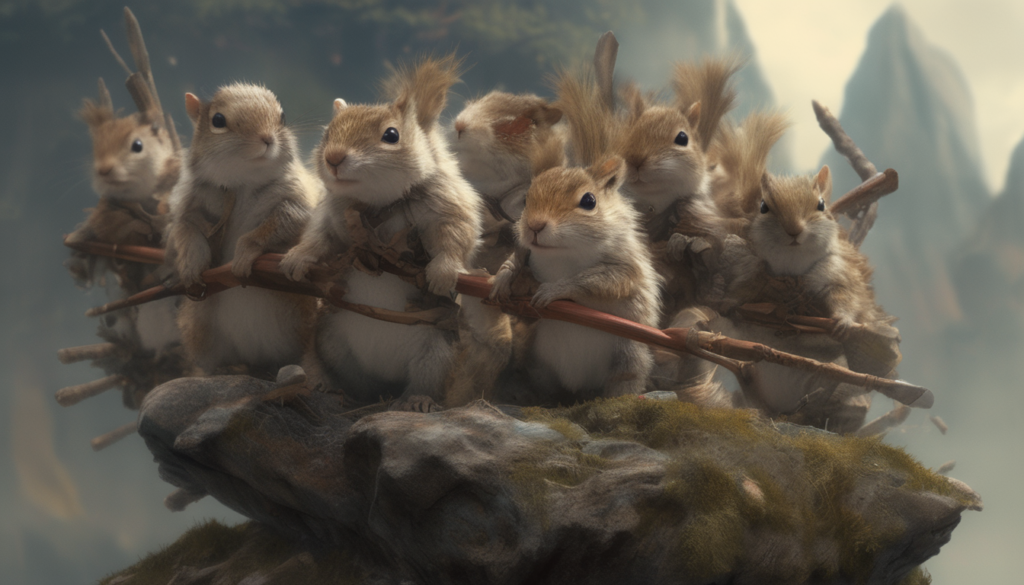
Step Variations Between Models
Here’s an example where the model disneyPixarCartoon_v10 requires more steps. All the others above ran the same prompt with only 5 steps. I remembered that this model suggested using 30 steps or more, so I thought I’d see how much difference that made.
Here’s the 5 step version:
…and the 35 step version:
With this next image, you can see the impact of running 35 steps on the RealitiesEdgeXLLCM_TURBOXL model, which was used to create the header image. It almost creates too much detail, at least when using the same prompt:
But the model LahCuteCartoonSDXL_alpha still looks soft (and cute AF!) at 35 steps.
While the model protogenV22Anime_protogenV22 failed epically with the same prompts overall, regardless of the steps!
In both of these, it’s clear that the model simply couldn’t resolve the noise, mentioned in how Stable Diffusion works, into anything useful.

Something I plan to explore further is understanding the differences between these two Dream Shaper models and why the XL_turbo performed sooo much better than the BakedVae version with the same settings. I’m assuming it has to do with how these two were trained. But, why? Maybe a different sampling method would impact results.
Future Exploration in Training Models
As far as I can tell, Automatic1111’s UI supports training, which I’ll be exploring soon. For now, there are plenty of settings that I’m still exploring to help me narrow down what direction I’ll be taking with all this before I’m ready to train my own models.
Seed variations and blending them, sampling methods, and styles are just a few of the settings I’ll continue to test out. That will help me understand how they work and what I can do with them.
Eventually, I hope to be able to consistently generate images that will lead to a bigger project. What that will be remains to be seen. Rest assured, I’ll be sharing whatever it is on my blog once I get there.
Upcoming Articles:
Be sure to subscribe to get these upcoming articles in your inbox: